CloudStack: Getting started
CloudStack: Getting started
Hello !
As you probably heard we had plans to launch a fully functional cloud for a long time now.
Finally, this is taking shape now and we already have a functional installation and a closed beta will be launched soon (a few testers are on it already).
A few words about it and what can offer:
1. We decided to go with CloudStack due to it's ease of access and operation, compared with other solutions as well as pretty decent support in HostBill.
2. It can do:
a. IaaS fully, due to OpenSwitch integration, we can setup networks and VLANs for the customer, effectively being able to carve chunks out of it similar to a dedicated server with VMs on it. This means we can offer things like virtual offices, for instance, with own firewall, internal networking, workstations, storage and mail/web servers, etc.
b. Full HA is possible, in case of one node going down due to hardware failure, the VMs will start on others;
c. You can load own ISO;
d. Snapshots provide the possibility of backing up easily;
e. You can make and download templates, as well as full drives and you can also upload them;
f. The infrastructure can be scaled up easily, we can simply add more servers and storage;
g. While some redundancy is needed for HA, polling the resources together reduces waste overall, the bigger the cloud, the more efficient it becomes.
3. For now, we only have KVM, but plan to add Xen-PV and HVM shortly.
4. There will be various degrees of access, most advanced features will only be available for the higher tier (Enterprise version) such as loading own ISO, internal networking, for example. We can simply sell fixed plans similar with solusvm like a vps or fixed resources where you can create a number of VPSes from (similar with solus reseller) as well as advanced IaaS plans, it is very flexible.
You are probably here because you have been offered the opportunity to test these services so, lets begin with the basics.
CloudStack UI
The fixed, VPS-like plans with monthly payment for resources will use the HostBill interface for access, however, more advanced plans will have unrestricted access at the cloudstack UI and, perhaps later, our own interface using the API.
For now, lets get started with the UI.
You can access it here:
https://master.iwstack.com/client/
You should have an username, a password and a domain. Domains can be anything, dont need to be FQDN style, for example mine is called Test1.
Once you login, you are presented with the Dashboard:
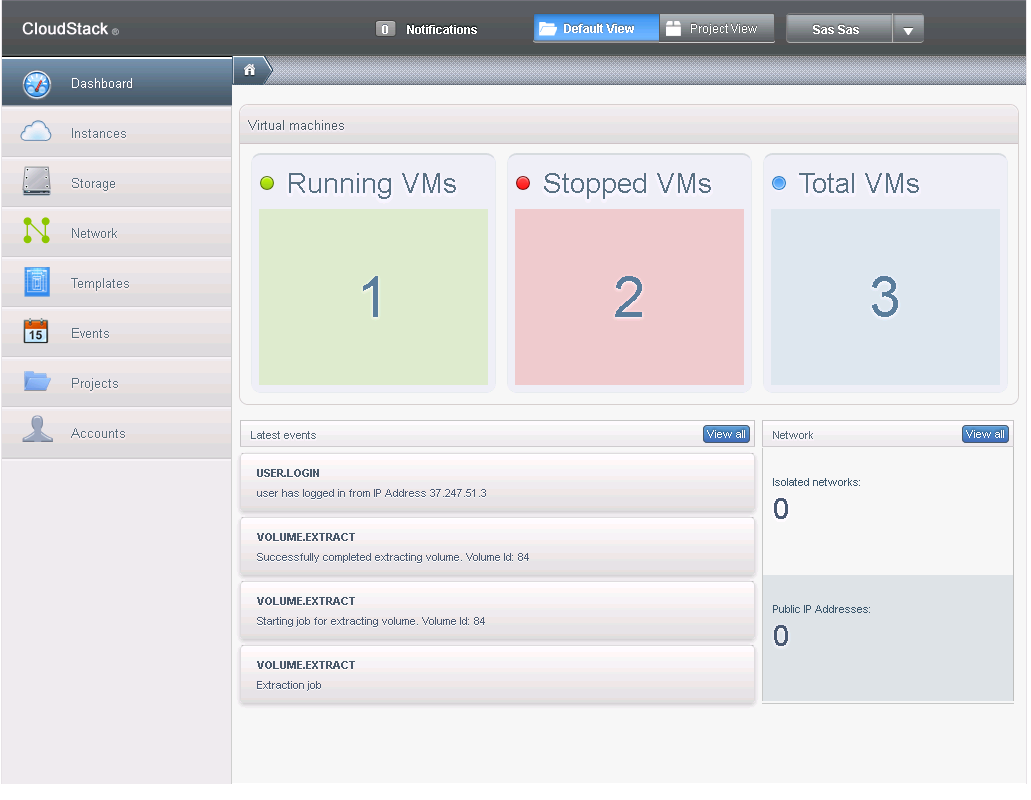
You can see the status of your account there.
As you can see, I already have some VMs in my account, I used them to make templates for the popular OSes (Debian 7, Centos 5 and 6, Ubuntu 12.04 LTS, both 32 and 64 bits as well as a full KDE desktop for Ubuntu 64). I will detail shortly on how to load them as well as install from own ISO or the the already loaded ISOs. Not all plans will be able to load own ISO, for example.
For now, lets get started with the UI.
You can access it here:
https://master.iwstack.com/client/
You should have an username, a password and a domain. Domains can be anything, dont need to be FQDN style, for example mine is called Test1.
Once you login, you are presented with the Dashboard:

You can see the status of your account there.
As you can see, I already have some VMs in my account, I used them to make templates for the popular OSes (Debian 7, Centos 5 and 6, Ubuntu 12.04 LTS, both 32 and 64 bits as well as a full KDE desktop for Ubuntu 64). I will detail shortly on how to load them as well as install from own ISO or the the already loaded ISOs. Not all plans will be able to load own ISO, for example.
Cloudstack UI: Creating our first instance
Let's create our first VM by using the templates.
Say we need a Debian 7 (Wheezy), 64 bit.
Go to instances:
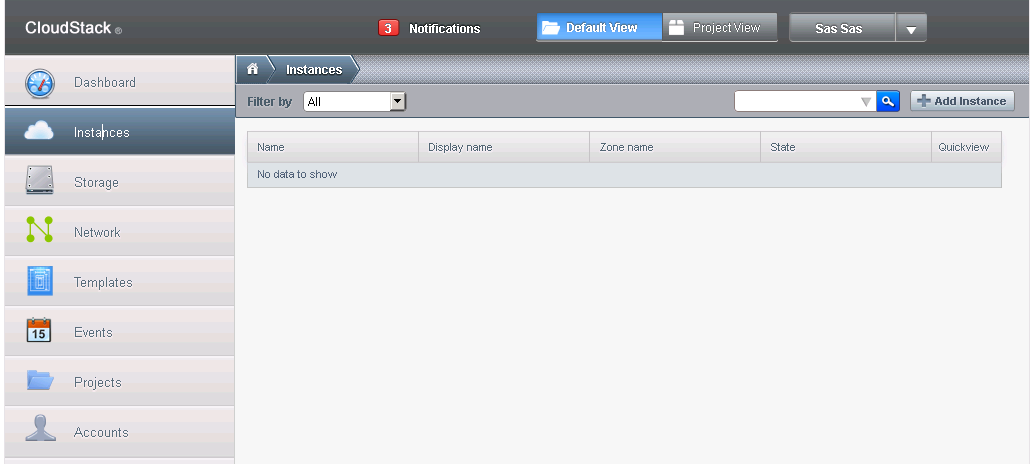
Select the upper-right button Add instance:
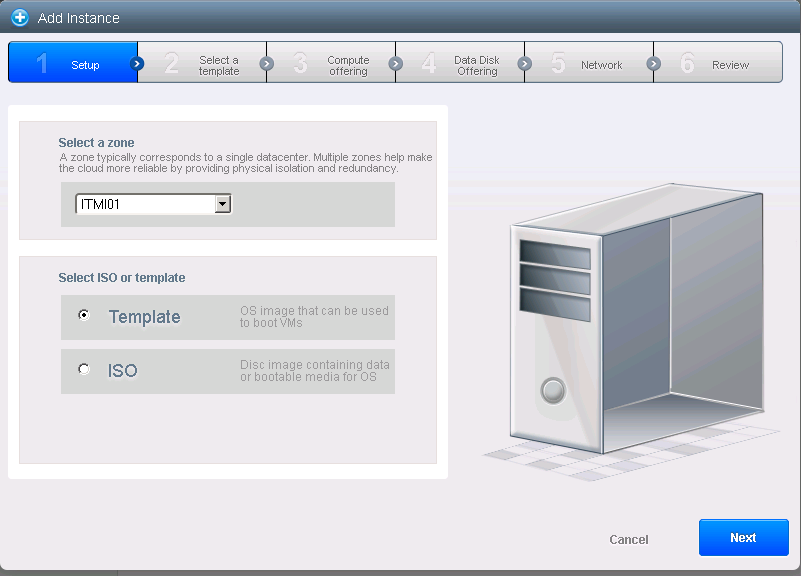
Template as method of creation is the default and should be already selected like in the picture, click next:
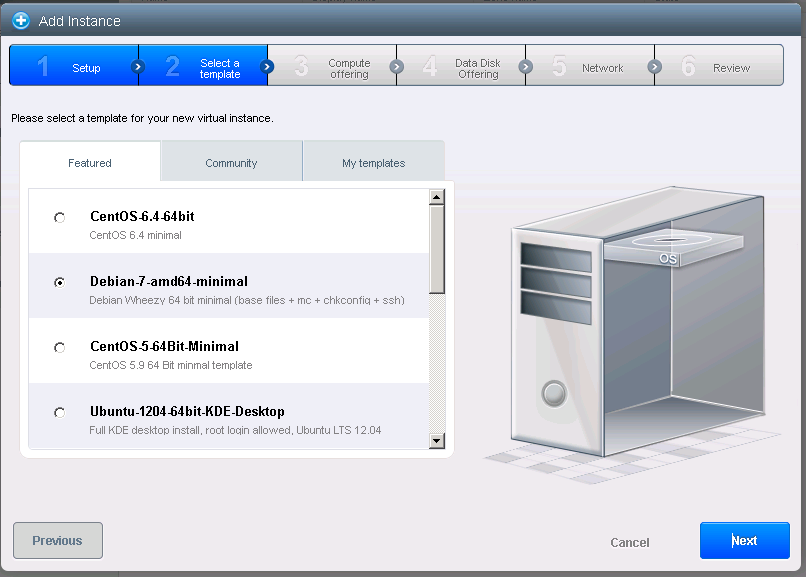
Normally, the templates should be in the Featured section, however, advanced plans can create own templates, so they will be in the My Templates section.
Select the Debian 7 64 template like in the picture (or any other, this is just an example I will use in this guide) and click next:
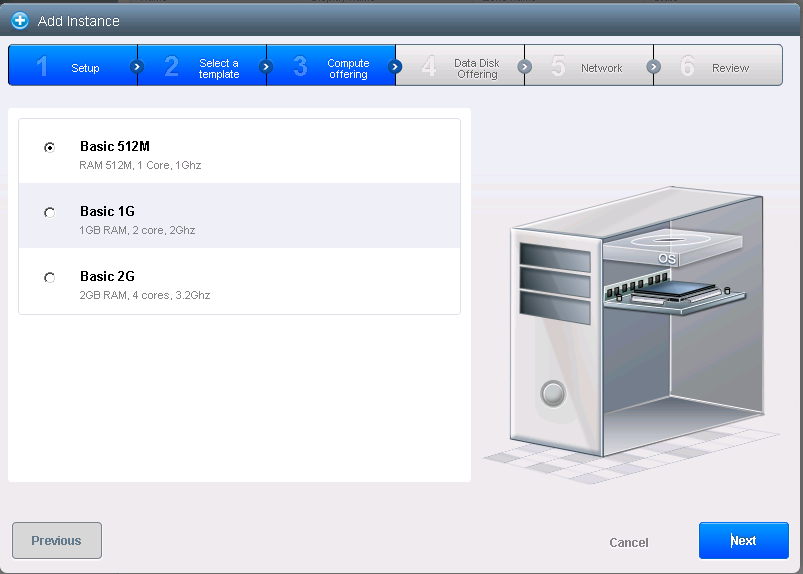
Depending on your plan and space available, you can select one of the VMs listed (there will be much more of them, we are only starting to create plans now). For the demonstration purposes I will use the Basic 512 one. Click next:
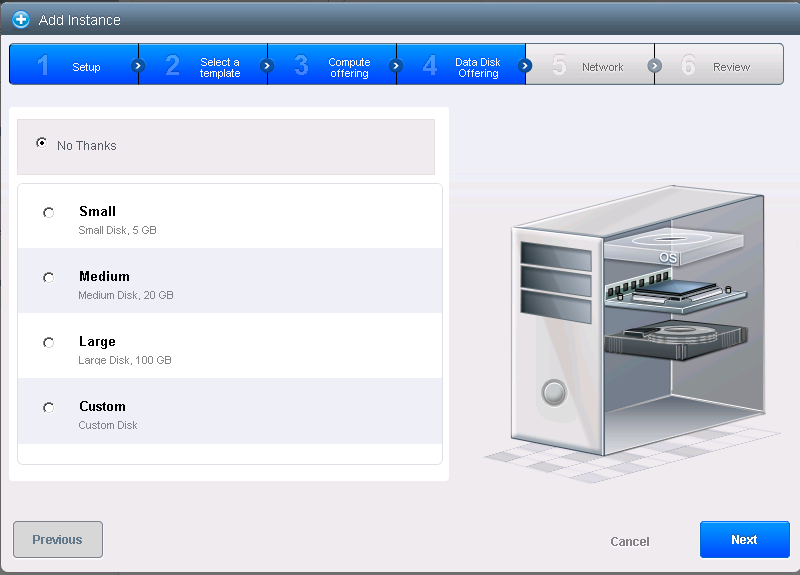
All templates I made so far are based on a "Medium" disk size. This means that you will create a VM with an already pre-defined disk holding the OS of 20 GB. You can add a data disk if this is not enough for you and your plan can accommodate it, I have chosen not to add another disk at this time, but as you can see, there are pre-defined ones as well as custom, but, as mentioned before, those will not be available to all plans, some will be simple, pre-defined VMs, much like the Solus based KVMs are now.
Click Next and take the only option, the default security group. As we advance with the setup and define more zones (this is a basic one), more options will be available, for example you will be able to control the firewall from the UI, but more on this in another guide, for now, we are doing only a basic VM.
Click Next:
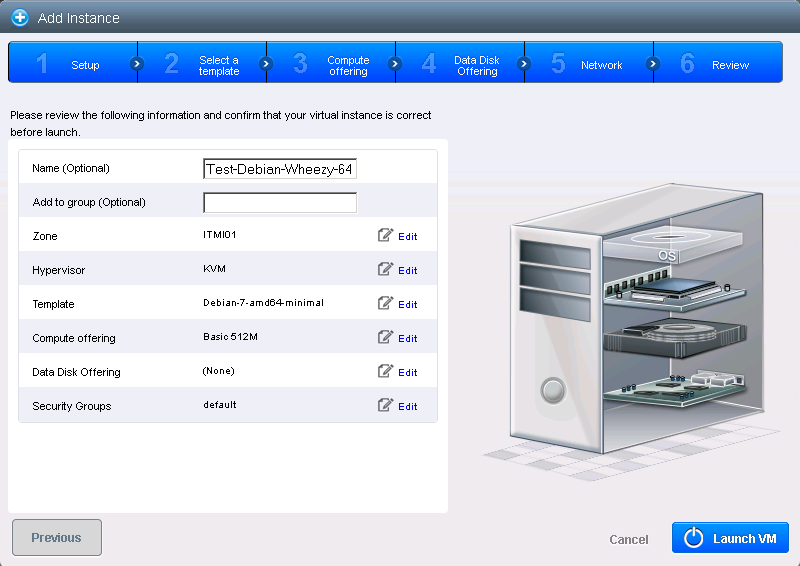
While it says a name is optional, will probably throw an error if you dont input anything, at best will give you something resembling an UUID, so better put up a name like I did. The Group is really optional and you can create one if you have more machines of the same kind, for example, in a IaaS environment you may wish to create the WorkStations and Servers groups.
We are done ! Click Launch VM and you are returned tot he Dashboard showing the creation process. After it finishes will give you the root password like this:
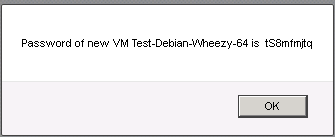
If you clicked OK too fast and didnt have a chance to write it down or you wrote it wrong, no worry, you can change it later (VM must be shutdown for this to work).
The UI is java based, therefore is rather slow and at times does not update, you may need to click other screens and come back to current one to see if it is done in some cases. For now we are running it in a VM, but I doubt later on a dedicated server will be much faster or more accurate, this is a java limitation that will stay, most likely. We will try to implement own interface using the API, but, for now, this will have to do.
Let's go to our VM now and get the IP where SSH is running (besides the ipv4 you get an automatic IPv6 one based on your MAC, I recommend using the ones linked to your IPv4-the /112). Go to the +sign and hover your mouse over it:
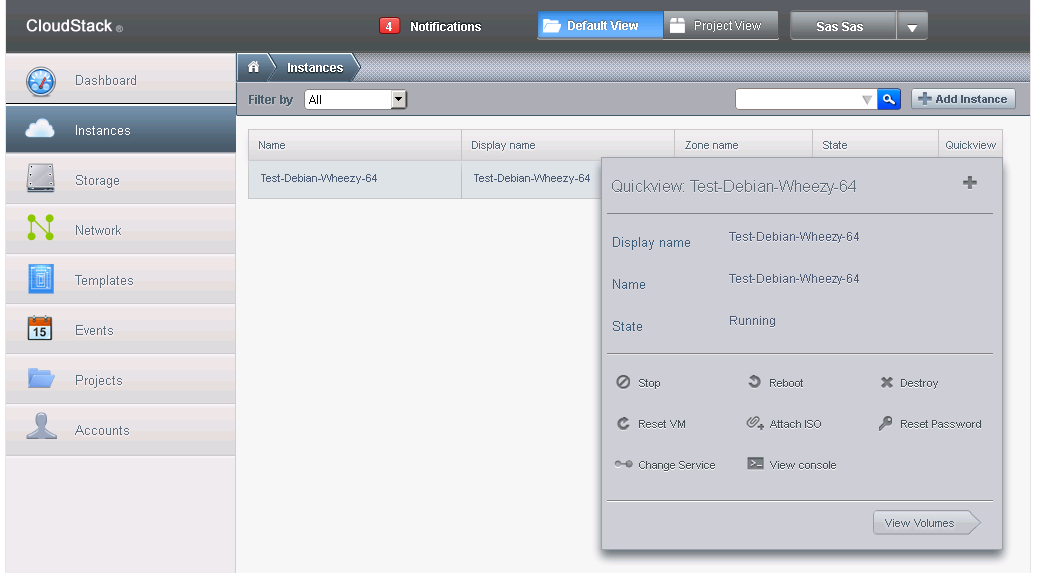
You can see there more possible actions, such as above-mentioned reset password, then attach ISO, stop (will change to start instance if it is stopped already), Destroy, Reset (reload template), Change service (add/remove disks, for example) as well as the java-vnc console.
We choose the last one and login to it:
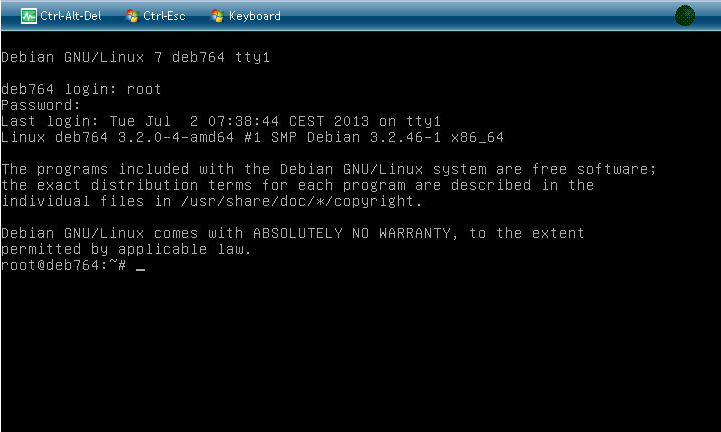
In order to see the IPs, issue the ifconfig command. you may also change the password to something more to your liking by issuing the passwd command but you will also need to do chkconfig cloud-set-guest-password off in order to stay that way because that service is resetting it and is needed for the reset password function to work. Once you are turning it off, changing password from the ui wont work anymore.
Alternatively, you can get your network settings by going to Instances, click the name you gave to your instance and select NICs tab:
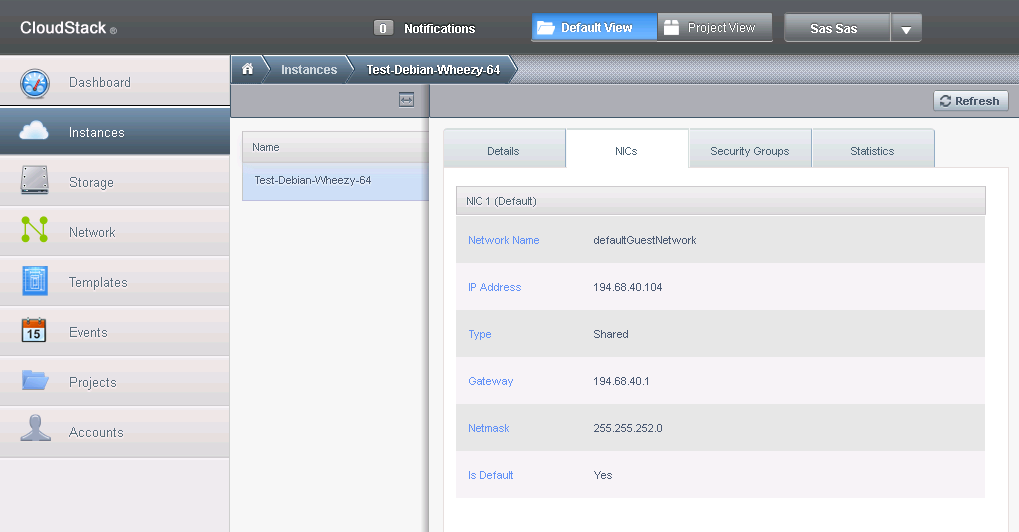
You can also use that IP to determine the associated /112 for IPv6 (you get one IPv6 by default which is linked to your MAC address, but there is a /112 allocated to every IPv4) like this:
http://prometeus.net/returnipv6.php?IP=194.68.40.104 (as per the IP in the picture).
You will get something like this:
Please remember that destroying and recreating your instance will most likely result in IPv4 AND IPv6 change. If you intend to keep those, do not recreate your instance as it will be next to impossible to retrieve your old IPs, they might be assigned to someone else already.
After this, you can admin your server using SSH. It is a minimal install like all the templates, it contains the base files, ssh, midnight commander, chkconfig and a script to change the password. while now templates are fresh, please make a habit to run apt-get update and apt-get dist-upgrade on debian/ubuntu and yum update on centos installs.
If the templates are not your thing and you wish to install another OS or version, you can use the ISO for that. If your plan allows, you can link your own ISO, but we will try to have the most popular ones already available for everyone.
The procedure is largely similar. Plase take care that, while your OS is probably listed, if it is not, select the closest relative in terms of packages and kernel, for example, if you use centos 5.9, select centos 5.7 from the list, for debian-based select the debian version on which they are based, etc.
Please note that we do not like IDE or any other NIC emulation than Virtio. If you are using BSD, please note latest FreeBSD/OpenBSD include the virtio drivers. If you see your OS selection comes with IDE by default, for example, in order to avoid performance problems for you and overhead for us, please select something else which makes use of Virtio, such as Debian, for example.
Say we need a Debian 7 (Wheezy), 64 bit.
Go to instances:

Select the upper-right button Add instance:

Template as method of creation is the default and should be already selected like in the picture, click next:

Normally, the templates should be in the Featured section, however, advanced plans can create own templates, so they will be in the My Templates section.
Select the Debian 7 64 template like in the picture (or any other, this is just an example I will use in this guide) and click next:

Depending on your plan and space available, you can select one of the VMs listed (there will be much more of them, we are only starting to create plans now). For the demonstration purposes I will use the Basic 512 one. Click next:

All templates I made so far are based on a "Medium" disk size. This means that you will create a VM with an already pre-defined disk holding the OS of 20 GB. You can add a data disk if this is not enough for you and your plan can accommodate it, I have chosen not to add another disk at this time, but as you can see, there are pre-defined ones as well as custom, but, as mentioned before, those will not be available to all plans, some will be simple, pre-defined VMs, much like the Solus based KVMs are now.
Click Next and take the only option, the default security group. As we advance with the setup and define more zones (this is a basic one), more options will be available, for example you will be able to control the firewall from the UI, but more on this in another guide, for now, we are doing only a basic VM.
Click Next:

While it says a name is optional, will probably throw an error if you dont input anything, at best will give you something resembling an UUID, so better put up a name like I did. The Group is really optional and you can create one if you have more machines of the same kind, for example, in a IaaS environment you may wish to create the WorkStations and Servers groups.
We are done ! Click Launch VM and you are returned tot he Dashboard showing the creation process. After it finishes will give you the root password like this:

If you clicked OK too fast and didnt have a chance to write it down or you wrote it wrong, no worry, you can change it later (VM must be shutdown for this to work).
The UI is java based, therefore is rather slow and at times does not update, you may need to click other screens and come back to current one to see if it is done in some cases. For now we are running it in a VM, but I doubt later on a dedicated server will be much faster or more accurate, this is a java limitation that will stay, most likely. We will try to implement own interface using the API, but, for now, this will have to do.
Let's go to our VM now and get the IP where SSH is running (besides the ipv4 you get an automatic IPv6 one based on your MAC, I recommend using the ones linked to your IPv4-the /112). Go to the +sign and hover your mouse over it:

You can see there more possible actions, such as above-mentioned reset password, then attach ISO, stop (will change to start instance if it is stopped already), Destroy, Reset (reload template), Change service (add/remove disks, for example) as well as the java-vnc console.
We choose the last one and login to it:

In order to see the IPs, issue the ifconfig command. you may also change the password to something more to your liking by issuing the passwd command but you will also need to do chkconfig cloud-set-guest-password off in order to stay that way because that service is resetting it and is needed for the reset password function to work. Once you are turning it off, changing password from the ui wont work anymore.
Alternatively, you can get your network settings by going to Instances, click the name you gave to your instance and select NICs tab:

You can also use that IP to determine the associated /112 for IPv6 (you get one IPv6 by default which is linked to your MAC address, but there is a /112 allocated to every IPv4) like this:
http://prometeus.net/returnipv6.php?IP=194.68.40.104 (as per the IP in the picture).
You will get something like this:
Code: Select all
Your IPv4: 194.68.40.104

Netmask: 255.255.252.0
Default gateway: 194.68.40.1
DNS: 8.8.8.8, 8.8.4.4

Assigned IPv6
you can use the equivalent of a /112, from the address
2a00:dcc0:eda:89:68:40:104:1/64
to the address
2a00:dcc0:eda:89:68:40:104:ffff/64

the default gateway is
2a00:dcc0:eda:89::1After this, you can admin your server using SSH. It is a minimal install like all the templates, it contains the base files, ssh, midnight commander, chkconfig and a script to change the password. while now templates are fresh, please make a habit to run apt-get update and apt-get dist-upgrade on debian/ubuntu and yum update on centos installs.
If the templates are not your thing and you wish to install another OS or version, you can use the ISO for that. If your plan allows, you can link your own ISO, but we will try to have the most popular ones already available for everyone.
The procedure is largely similar. Plase take care that, while your OS is probably listed, if it is not, select the closest relative in terms of packages and kernel, for example, if you use centos 5.9, select centos 5.7 from the list, for debian-based select the debian version on which they are based, etc.
Please note that we do not like IDE or any other NIC emulation than Virtio. If you are using BSD, please note latest FreeBSD/OpenBSD include the virtio drivers. If you see your OS selection comes with IDE by default, for example, in order to avoid performance problems for you and overhead for us, please select something else which makes use of Virtio, such as Debian, for example.
CloudStack: Taking snapshots
Once we setup the services and the VM in general as we liked, we may wish to take a snapshot to be able to re-deploy it fast in case we screw up something, was hacked, whatever.
Please note that, while we use Enterprise class SAN storage, there might be other problems than hardware failure, such as data corruption, hacking, human error, we do not guarantee your data, so, taking backups, preferably offsite, is the safest option, you can download your entire virtual drive if you wish to (in the storage menu, the + sign), for example, we offer free ftp storage as well as paid, onsite and offsite, there are no excuses.
So, snapshots are a convenient way to have your setups saved, not a method of backup, in most cases, if the main storage is lost, such as in a fire or major earthquake, the snapshot is lost too as well as other locally stored backups, so, you have been warned.
Now, we can take snapshots of the running VM by going to Storage and selecting the root disk attached to our VM and hovering over the + sign at the right:
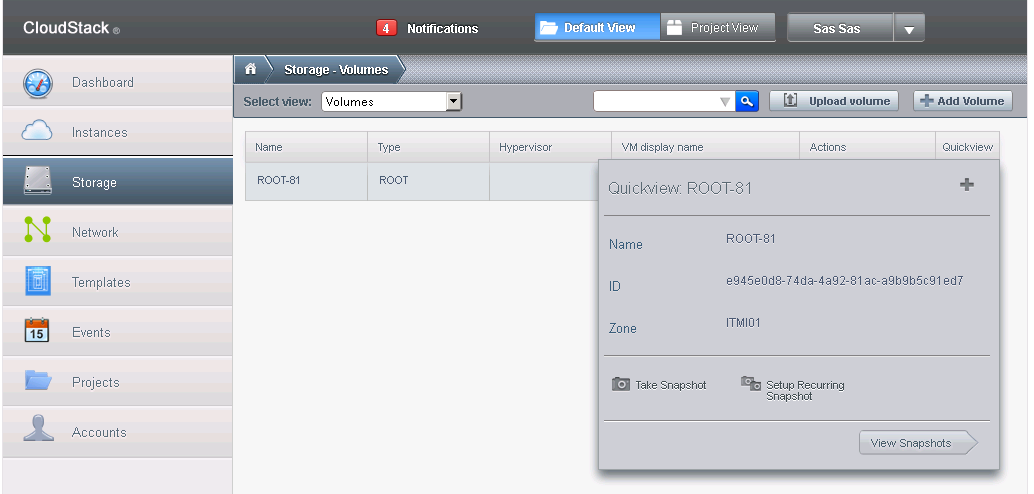
You can see that you can take snapshots at will as well as setup them to occur at fixed intervals.
You can view the existing snapshots by selecting Snapshots view in the Storage section:
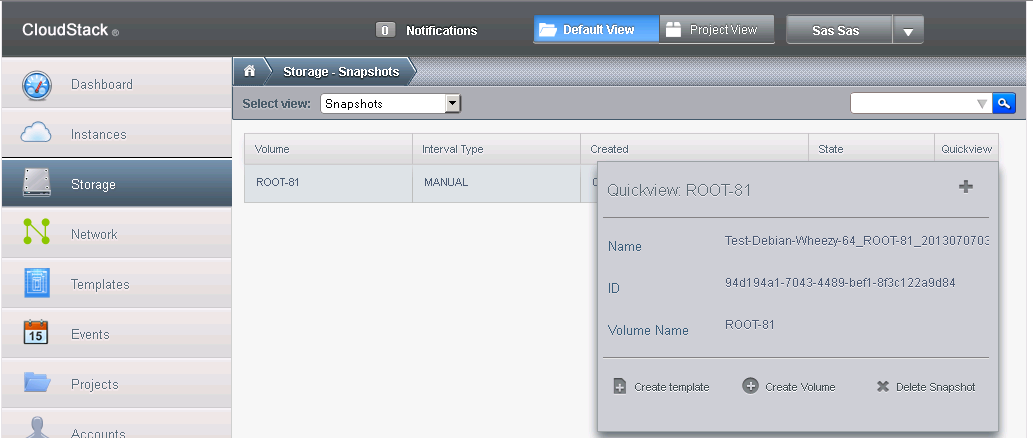
As you can see, you can create a volume as well as a template from the snapshot. For this to work you need to have the necessary permissions and the necessary space.
Please note that, while we use Enterprise class SAN storage, there might be other problems than hardware failure, such as data corruption, hacking, human error, we do not guarantee your data, so, taking backups, preferably offsite, is the safest option, you can download your entire virtual drive if you wish to (in the storage menu, the + sign), for example, we offer free ftp storage as well as paid, onsite and offsite, there are no excuses.
So, snapshots are a convenient way to have your setups saved, not a method of backup, in most cases, if the main storage is lost, such as in a fire or major earthquake, the snapshot is lost too as well as other locally stored backups, so, you have been warned.
Now, we can take snapshots of the running VM by going to Storage and selecting the root disk attached to our VM and hovering over the + sign at the right:

You can see that you can take snapshots at will as well as setup them to occur at fixed intervals.
You can view the existing snapshots by selecting Snapshots view in the Storage section:

As you can see, you can create a volume as well as a template from the snapshot. For this to work you need to have the necessary permissions and the necessary space.
CloudStack: Conclusion
Cloudstack is a powerful, yet simple enough orchestrator, which can perform many functions, from replacing SolusVM to offering management for complex infrastructures offered as a service, with tens of VMs, back-ups, VLANs, complex routing and isolations, bridges, resource allocations, from local storage servers to HA clusters, from KVM and Xen to VMWare and rhev, they can all be controlled and managed with the help of CloudStack.
As you could see, basic operations are performed through point and click, very easy even for people which never looked at a cloud UI before. I am sure most of you didnt even need this guide to get started, I will detail more complex procedures later once we have our plans in place and beta-testing is done.
As you could see, basic operations are performed through point and click, very easy even for people which never looked at a cloud UI before. I am sure most of you didnt even need this guide to get started, I will detail more complex procedures later once we have our plans in place and beta-testing is done.
Re: CloudStack: Getting started
sign me up boss!
Re: CloudStack: Getting started
Will do, just need more people and then we decide where to assign each.
Re: CloudStack: Getting started
I found the IP on the web interface, you don't need to use the crazy console for this.
1. Instances
2. Click on instance name
3. Right side appears, click NICs, look at IP Address
1. Instances
2. Click on instance name
3. Right side appears, click NICs, look at IP Address
Re: CloudStack: Getting started
Unfortunately, completely avoiding the console is not really possible, I used the IP finding to introduce it.
We will see what can be done to use own VNC client with this.
We will see what can be done to use own VNC client with this.
Re: CloudStack: Getting started
what would be the pricing in the future?
Who is online
Users browsing this forum: No registered users and 7 guests
